|
Home
Up
parts list
Doing the swap
| |
Unfortunately , I didn't take any pictures of
removing the original C4 tranny but will give a quick guide to help. Also, I did
this swap by removing the engine and transmission as the same time. I find
this way to be easier since I worked off of a jack and jack stands. This way is a
little more work since it also involves removing the engine but its gave me a
chance to clean, paint and freshen up the engine with new gaskets, bearing and rings.

This is a guide to swapping the AOD tranny and will be
from the point of removing the engine and tranny together.
- jack up the car and if possible place front and rear on
jack stands
- drain the radiator, the engine oil, and the tranny
fluid so you don't have a big mess of everything spilling when you remove the
engine and tranny. The tranny is drained by removing the bolts that hold the
pan on . you should leave 1 or 2 bolts in but lose enough for the fluid to
drain. after its drained replace and snug up at least 2-3 of the pan bolts
- remove the drive shaft. you need to loosen and remove
the 4 nuts holding the u-bolts that connect the driveshaft to the rear end.
wrap tape around the u-joint to keep the bearing caps from coming off.
Then slide the driveshaft back toward the rear of the car till it is out of
the back of the transmission. you may need to tap on it with a hammer. once
out inspect it for any grooves or signs of wear then set it aside.
- remove the exhaust. remove the exhaust pipes as far
back as you can. You don't need to have anything hanging down under the
car that will get in the way and give you problems later on. the exhaust
manifolds can stay on or be removed at this point. If you have headers you
will have to remove them as they will no longer fit with the AOD tranny.
- remove the shift linkage from the shifter and the trans
shift lever. this can be a pain if the bushing in the lever is old and hard
but just pry on it and pop it out. replace it with new bushing from the
dealership later on.
- cut the wires to the neutral safety switch. you wont
need it again and will have to splice the wires from the AOD switch to the old
harness
- remove the speedometer cable. save it cuz you will
reuse it later. if you can find an old piece of speedo cable to put back in
the tranny it will keep it from leaking any fluid still in the tranny when you
remove it.
- disconnect and remove the kickdown lever (tranny
removal only)
- remove the subframe crossmember between the bellhousing
and the big front end crossmember
- support the tranny with a jack and remove the 2 bolts
holding the rear trans crossmember to the frame
- remove the crossmember from the transmission
- that should finish the tranny if you were just
removing the tranny at this point you would remove the starter, unbolt the
converter, remove all the bellhousing bolts and then remove the tranny.
Now on to the engine removal
- remove all wiring, hoses, fuel lines, the battery,
remove the cable from the starter, the radiator, the fan, steering pump
accelerator cable.
- remove the 2 engine mount bolts and then remove the
engine and transmission together.
- after you have removed the engine/trans and while
it is still on the hoist (this is the easiest way I've found) unbolt the
converter, remove the starter
- after setting the engine and tranny on a bench or the
floor, remove all the belhousing bolts and separate the engine and tranny.
- remove the flywheel. you are now ready to clean, paint
and do any other work that you wish to do to the engine and AOD tranny .
Something I STRONGLY RECOMMEND is replacing the front and real transmission
seals and the rear tranny bushing to insure against leaks. Its
stupid to go this far and have a leak.
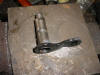
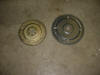 this
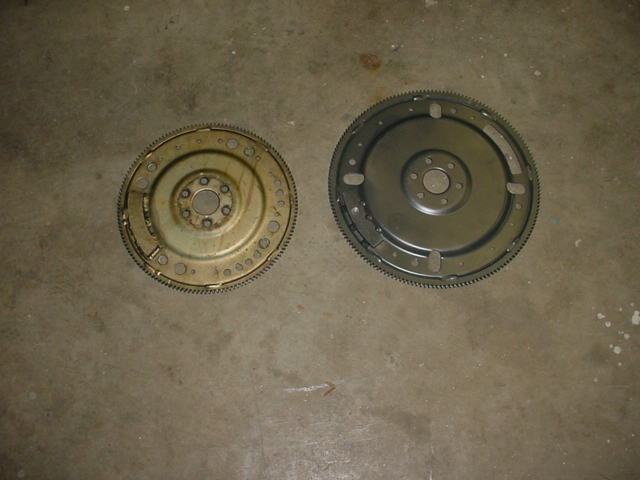
pic is of the ART CARR 50oz C4 141 tooth flywheel and the AOD 164 tooth
flywheel this
pic is of the ART CARR 50oz C4 141 tooth flywheel and the AOD 164 tooth
flywheel
-
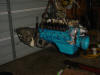
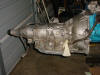
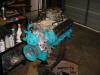 This
is the engine after being painted and freshened up with bearings, rings, and
gaskets. it would be a crime to do this much work and have a leak
smearing things up. If you paint the engine I really recommend using a clearcoat engine
enamel over the color coat . it give a great shine and helps protect the
color. This is the light ford blue color. I also added a camshaft and did some
head work. This
is the engine after being painted and freshened up with bearings, rings, and
gaskets. it would be a crime to do this much work and have a leak
smearing things up. If you paint the engine I really recommend using a clearcoat engine
enamel over the color coat . it give a great shine and helps protect the
color. This is the light ford blue color. I also added a camshaft and did some
head work.
-
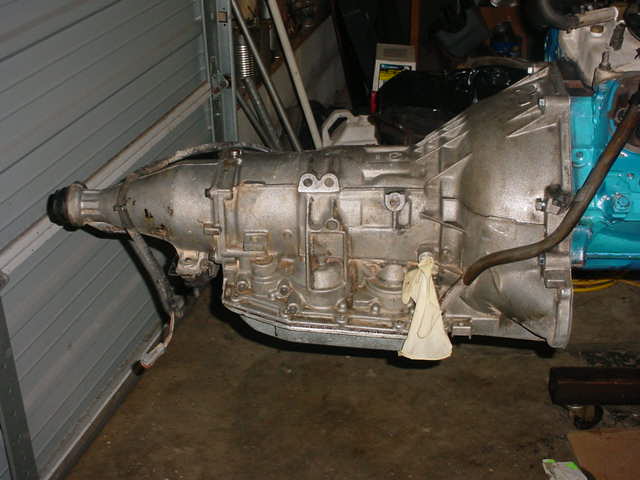
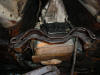
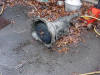 The
old C4 notice how small the bellhousing is. also notice how far back the
converter sits inside the bellhousing. This is how is should look whenever you install a converter in a C4. Once you get it out measure it to make sure
the new AOD is the same length or you will have extra expense of having the
drive shaft shortened. The
old C4 notice how small the bellhousing is. also notice how far back the
converter sits inside the bellhousing. This is how is should look whenever you install a converter in a C4. Once you get it out measure it to make sure
the new AOD is the same length or you will have extra expense of having the
drive shaft shortened.
- Now might be a good time to connect the harness for the
AOD's neutral safety switch and backup light switch. If you haven't cut
the wires to the C4's switch go ahead and do it . Then solder the AOD's
harness to the old harness the connector runs under the carpet and plugs in
above the gas petal. Sorry, I don't remember that the wires are cuz they
are different for each year. the important thing is that there are two wires
for the neutral switch and the other two are for the backup light switch.
- once you have everything cleaned and ready mount the
converter to the AOD tranny it should sit back inside the bellhousing when it
is correctly installed. also if you are using a new converter it is a good
idea to add a quart of tranny fluid to the converter before installing it.
- place the sheetmetal blockplate on the block (it just
sets on the 2 guide pins) and bolt on the new AOD flywheel. if you forget you
will have to remove and install the flywheel a second time.
- mate the engine and tranny by putting them together and
bolting them up. REMEMBER!!! if it doesn't go together properly don't force it!!
separate and make sure the converter is all the way back in the bellhousing.
Also make sure the bolts on the converter are lined up with the flywheel as
you put it together.
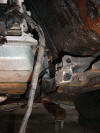
- you should now be here. notice how much bigger the AOD
is. Size matters cuz it will really make the exhaust hang lower and limit you
to stock manifolds or cutting the inner fenders and custom headers. This
should be kept in mind if you are going to do this swap
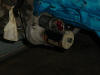
- install the starter. you have an option at this point
to install a smaller more powerful gear reduction starter used on newer 5.0's
if you wish. It gives you more clearance but also adds a change in the wiring.
this is the smaller starter
- you should remove the tranny pan and filter and clean
it out real good. the kickdown lever should be removed and will be replaced
with the one from LOKAR. the shift lever will need to be removed/installed several times
later on. This is because if you use the stock shifter the shift arm on the
transmission will need to be lengthened approx. 3/4" , You lengthen
it by cutting it, adding some steel and then welding it. the reason you
have to lengthen it is that the stock shifter will not line up
correctly. You have to do this till you get the shifter indicating
correctly for P-R- N -D-1. DO NOT TRY BENDING this
lever with a hammer!!!! It is riveted to the shaft and will crack and
come loose. This is also required to help with the shift lever clearance
because you need it to match the bends of the old shift lever on the C4. The important thing is that the Transmission
is in park when the shifter is in part or you risk the car driving down the
road without you. (yes, this did actually happen to me) to do this you will
have to remove and reinstall the shift lever several times. This is a trial
and error process and why we left the trans pan loose.
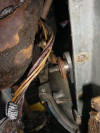 
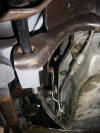
- Lever
before Modification. Notice that the lever must be pointed up not down to use the stock
shifter and rod.
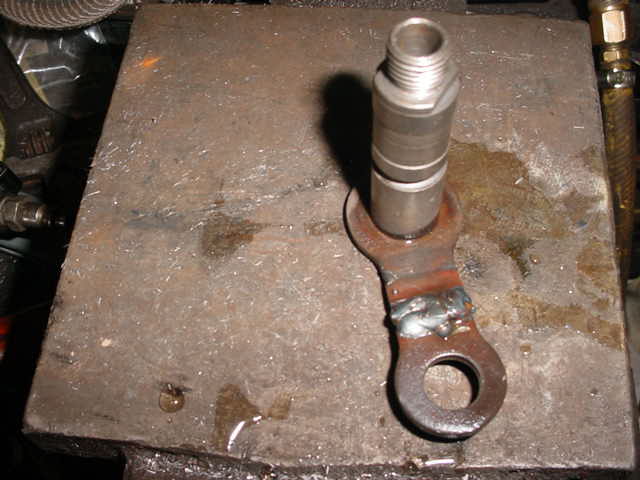
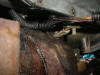
- Lever after modification
   notice
that the direction of the bend is reversed from the original position giving
more clearance. you can also add a transmission drain plug at this
time if you wish. they sell the kit for about $10 at AutoZone. notice
that the direction of the bend is reversed from the original position giving
more clearance. you can also add a transmission drain plug at this
time if you wish. they sell the kit for about $10 at AutoZone.
- reinstall the tranny pan with a few bolts. Don't worry
about installing a gasket or filter till you are done cuz it will come back
off several times
- remove AOD mount and install the original C4 mount and
crossmember. I used the original crossmember but you can fabricate one to use
the stock holes if you want. this just worked well for me and took less
fabrication and welding.
- Now is the time for the Mock-up. you will have to
install the engine and tranny back into the car to see how everything fits.
don't bolt anything in cuz it may need to come back out a time or two. It will
be a little tighter fit that with the C4 but will go in. Once in and the engine mounts are
seated, raise the tranny with a floor jack till its about at the right height.
install the C4 crossmember (or fabricate your own) and plan the location of the new crossmember mounts.
They should be somewhere around 1" lower than the original holes. check
clearance for the shift lever.
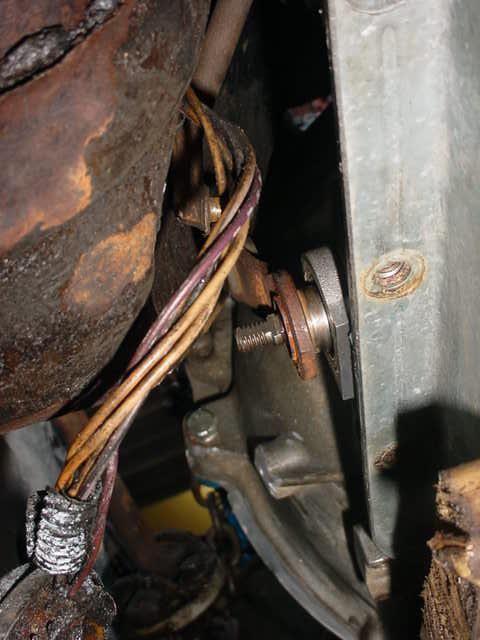
   These
mounts are rounded over on the ends to fit the curves of the C4 crosmember.
Also you may notice that they are not directly under the original holes. This
is cuz I was working on my back and wasn't paying attention. Also, I strongly
recommend increasing the mounting holes to allow the use of 1/2 or
larger bolts considering the load being carried. These
mounts are rounded over on the ends to fit the curves of the C4 crosmember.
Also you may notice that they are not directly under the original holes. This
is cuz I was working on my back and wasn't paying attention. Also, I strongly
recommend increasing the mounting holes to allow the use of 1/2 or
larger bolts considering the load being carried.
- you will have to take a hammer and make some clearance
in the drivers side of the transmission tunnel. You have to have enough clearance for
the shift lever and the shift rod. Keep in mind that the area you are beating
on is right next to the accelerator pedal and will have some affect as to how
your foot moves down there so only go as much as necessary. Also when you cut
and weld the shift lever you have to reverse the way its bent as you can gain alot
of clearance as well. As you can see in the picture.
 one way around alot of this guess work is to use a different shifter and shift cable,
say out of a later model mustang. Either way you will need to reverse
the bend of the shift lever to match the bend of the original C4 lever. I just chose to go this route
to keep
it looking stock.
one way around alot of this guess work is to use a different shifter and shift cable,
say out of a later model mustang. Either way you will need to reverse
the bend of the shift lever to match the bend of the original C4 lever. I just chose to go this route
to keep
it looking stock.
- once you have the shift lever done you can install the
trans pan gasket, filter and all the bolts
- Install the speedo cable into the tranny. It fits the
same as before.
- Install the front sub frame crossmember. you will need
to do some cutting and grinding to clear the larger bellhousing.
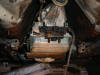
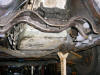
- At this point you should have the tranny mounted, all
the connections made and the shift lever modified and installed the
tranny portion of the TV (kick down) cable. from underneath it should look
like this.
- install the driveshaft
- run the tranny cooler lines to the radiator. For
those that plan on a second cooler and filter the top fitting is the pressure
side for the lines. That means you want to run that line to the radiator
and install the second cooler to the line coming out of the radiator and
returning to the tranny. this way the radiator does the initial cooling and
the second cooler lowers the temp even more. Install the TV cable and adjust
it so that the arm on the tranny is wide open when the throttle is fully
opened. once you have it back on the road its a good idea to take it to a
tranny shop to have them do a final adjustment of the cable . they will plug a
gauge into the tranny and check the pressure with it running and adjust
it to somewhere around 33 psi. at a cost of about $50 its cheap insurance
to make that tranny last.
-
TO BE CONTINUED.................This is all
I have pics for at this time All that's left is to add fluid , run the new exhaust, start
the car and check for leaks and test drive. If I've left anything out or
you have questions, suggestions please email me.
After thoughts...........
There were some things I learned later that I wanted to add
and share that may be of help . The AOD tranny I used was bad an had to be
removed and be rebuilt . The friend I bought it from was a true friend and took
care of fixing it which is rare these days. when you shop for a tranny be
sure its good or it has a warranty. I also discovered that if you do the
swap using the mounting system as I have described above you can use the AOD or
the original C4 tranny without any more modifications.
Swapping back to the C4 requires changing the flywheel and blockplate and
reinstalling all the old C4 parts and a new neutral safety switch.
if you use the stock manifolds you will
need to check clearance on the passenger side manifold and the bellhousing.
I had a small bump in the manifold that was causing an exhaust leak. fixing it
just took 3 min of grinding so it didn't touch the bellhousing. Also when you
have the muffler shop install the exhaust make sure they have a way to remove
just the front section of pipe so that if you need to remove the tranny
you don't have to cut and repair the exhaust.
mailto:cyberbudda
|